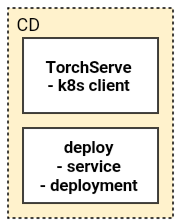
이 포스팅에는 위의 CD 단계 중 torch-model-archiver에 관련된 내용을 담고 있다.
이전 포스팅에서 언급한 것 처럼, 버전 문제로 KFServing 대신 TorchServe Github를 사용하였다. TorchServe는 pytorch로 개발된 머신러닝 모델을 deploy 할때 사용되는 프레임워크이다.
pytorch/serve
Model Serving on PyTorch. Contribute to pytorch/serve development by creating an account on GitHub.
github.com
TorchServe는 아래와 같은 장점이 있다.
- 다중 모델 서비스
- A/B 테스트를 위한 모델 버전 관리
- RESTful API 지원
- Metrics/Logging 관리
- …
TorchServe는 mar(Model Archive) 형식을 사용해 모델을 배포하기 때문에, 우선 torch-model-archiver을 이용하여 모델을 압축해야한다.
torch-model-archiver
torch-model-archiver Github 은 CLI로 실행할 수 있다. torch-model-archiver의 중요한 Arguments는 다음과 같다.
- –model-name
- 모델이름
- 설정한 모델이름으로 mar 파일이 만들어진다. 모델이름.mar
- –version
- 버전 정보
- –serialized-file
- .pt 또는 .pth 파일 위치
- 본 프로젝트에는 TorchScript로 모델을 저장하였기 때문에 .pt 파일 사용
- state_dict을 포함하는 .pth 파일의 경우 –model-file 파라미터가 필요하다.
- –handler
- data가 들어왔을 때 전처리/inference/후처리 를 관리하는 python 파일 경로
- –extra-files
- 함께 압축되어야하는 파일
- –export-path
- mar 파일이 저장될 경로
- –requirements-file
- TorchServe 할때 필요한 python package
본 프로젝트는 이미지를 임베딩 한 후 faiss를 사용하여 예측 하기 때문에, handler를 custom 하였다.
# MyHandler.py

import logging
import torch
import torch.nn.functional as F
import io
from PIL import Image
from torchvision import transforms
from ts.torch_handler.base_handler import BaseHandler
import faiss
import json
import numpy as np

class MyHandler(BaseHandler):

    def __init__(self, *args, **kwargs):
        super().__init__()

        self.face_index, self.face_label = self.load_nn_model(
            "./faiss_index.bin",
            "./faiss_label.json"
        )

    def load_nn_model(self, faiss_model_path, faiss_label_path):
        face_index = faiss.read_index(faiss_model_path)

        with open(faiss_label_path, "r") as l:
            face_label = json.load(l)

        return face_index, np.asarray(face_label)

    def preprocess_one_image(self, req):
        image = req.get("data")
        if image is None:
            image = req.get("body")

        image = np.asarray(Image.open(io.BytesIO(image)).convert("L"))
        image = torch.from_numpy(image)
        image = image.unsqueeze(0)
        image = image.unsqueeze(0).float()
        return image

    def preprocess(self, requests):
        images = [self.preprocess_one_image(req) for req in requests]
        images = torch.cat(images)
        return images

    def inference(self, x):
        embeddings = self.model.forward(x)

        dists, inds = self.face_index.search(embeddings.detach().cpu().numpy(), 3)

        dists = dists[:,0]
        preds = self.face_label[inds[:,0]]

        return dists.tolist(), preds.tolist()

    def postprocess(self, predictions):
        dists, preds = predictions

        res = []
        for dist, pred in zip(dists, preds):
            res.append({"dist":dist, "pred":pred})

        return res
MyHandler class는 생성될 때 faiss index와 label을 load 한다. 그리고 preprocess, inference, postprocess 을 통해 인풋으로 들어온 이미지를 예측된 결과로 내뿜게 된다.
- preprocess
- 이미지 resize 및 전처리
- inference
- 임베딩 모델 inference
- faiss 모델 inference
- postprocess
- json 형식으로 return
# handler.py

from MyHandler import MyHandler

_service = MyHandler()

def handle(data, context):
    if not _service.initialized:
        _service.initialize(context)

    if data is None:
        return None

    data = _service.preprocess(data)
    data = _service.inference(data)
    data = _service.postprocess(data)

    return data
위에서 만든 MyHandler을 handler.py에서 선언하고, 들어온 data를 차례로 넘겨준다.
torch-model-archiver --model-name embedding --version 1.0 --serialized-file model.pt --extra-files MyHandler.py,faiss_index.bin,faiss_label.json --handler handler.py --requirements-file requirements.txt위는 torch-model-archiver을 실행하는 커맨드이다. MyHandler.py, faiss_index.bin, faiss_label.json 은 handler.py가 실행될 때 필요하기 때문에 extra-files 옵션에 넣어주었다. 마지막으로 faiss와 numpy를 사용하기 때문에 –requirements-file 옵션을 사용하여 파이썬 패키지를 설치하도록 한다. 비로서 torch 모델이 압축된 mar 파일을 생성하게 된다.
다음 포스팅에는 생성된 mar 파일을 통해 deploy 하는 TorchServe와 kubeflow 파이프라인에서 이를 deploy 하는 코드를 소개한다.
References
[MLOps/Projects] - [Toy] MLOps Toy 프로젝트 소개
[MLOps/Projects] - [Toy] MLOps System Design
[MLOps/Projects] - [Toy] CI/CD using Github Action
[MLOps/Projects] - [Toy] CT using Kubeflow pipelines - 1
[MLOps/Projects] - [Toy] CT using Kubeflow pipelines - 2
[MLOps/Projects] - [Toy] Serving TorchServe in kubeflow pipelines - 1
[MLOps/Projects] - [Toy] Serving TorchServe in kubeflow pipelines - 2
'MLOps' 카테고리의 다른 글
| [Toy] Trigger using Slack (0) | 2021.02.01 |
|---|---|
| [Toy] Serving TorchServe in kubeflow pipelines - 2 (0) | 2021.02.01 |
| [Toy] CT using Kubeflow pipelines - 2 (0) | 2021.02.01 |
| [Toy] CT using Kubeflow pipelines - 1 (0) | 2021.02.01 |
| [Toy] CI/CD using Github Action (0) | 2021.02.01 |


